
3. Enter the Name or Fax Number of your intended recipient in the To: field. Alternatively, select a Contact by clicking the Select a Contact icon  .
.
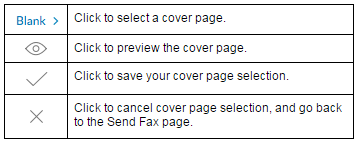
3. Select a Cover Page from the available cover page templates.
Available commands:
4. Under Recipient Details, add the recipient's Name, Company, and a Note. These information will appear in the Cover Page.
5. Attach files by dragging and dropping to the attachments box or by clicking the Attach file icon  . To learn which file types may be attached to the fax, check this article on Supported File Attachments for Faxes.
6. Click Send Now.
NOTE: Clicking Send Later enables you to set a schedule when the fax will be sent. On the calendar pop-up, set the date and time, then click Schedule Send.

